
-
Why is the front of my sprayer dripping?
For dripping, you can try and tighten the nozzle dial by using the provided nozzle removal tool. Place the nozzle removal tool onto the nozzle selector and rotate the nozzle removal tool fully to the right to tighten the nozzle selector. -
Why is the front area of my sprayer getting saturated as I spray?
We refer to what you are experiencing as “blowback.” This is very common with electrostatic sprayers. Since the liquid particles are charged as they exit the unit, some users may find that the liquid is adhering to the front of the unit as well as to the surfaces being sprayed. We suggest bringing along a small rag to periodically wipe away the build up from the front of the sprayer. This will help minimize any dripping caused by "blowback.“ -
Why is there dripping from the front area when I am not using the sprayer?
With any sprayer, there will be a small amount of liquid that can continue to come out of the front of the unit after releasing the trigger. A quick tip and solution to this, is to turn the nozzle selector to the “Remove Nozzle” setting when it is not in use, or when walking from room to room. This creates a seal and will keep any liquid within the front of the sprayer from dripping out of the nozzle. -
What should I do if I notice that my electrostatic technology is working intermittently?
• Turn off the ES function • Remove Nozzle Selector from the sprayer • Allow the sprayer and nozzle selector to dry (users may do this by blowing off parts with compressed air, or placing under a fan) • Reassemble Nozzle Selector into the sprayer and turn ES function back on -
What should I do if my nozzle selector is rotating freely (not locking into place) and leaking?
• Turn the Nozzle Selector to each setting while listening and feeling for the click that signals the selector is in place • If there is no click for each nozzle setting, the detent ball may be missing • If you believe that the detent ball is missing, call customer service at 1-877-634-5704 to receive a replacement part -
What is the best way to clean my sprayer?
• If there is any chemical in the tank after use, the tank should be drained for cleaning ***Accessory Tanks can be purchased for the 1 Gallon Sprayer specifically to clean the sprayer lines to prevent chemical waste • Fill tank 1/3 full with clean water and spray until the tank has been emptied • Remove Nozzle Selector and soak it in warm, soapy water • Blow compressed air through the front of the metal nozzles to remove remaining internal blockages • Let all parts dry completely before reinstalling and storing the unit -
What is the best way to clean my nozzle selector?
• Rotate key to the left to remove nozzle ring. • Remove Nozzles and orings from the nozzle selector and soak in warm soapy water • Agitating the nozzles while in the water will loosen the blockages • Blow compressed air through the front of the nozzles to remove any remaining blockages • Reassemble Nozzle Selector in the same order that the pieces were removed • Each individual nozzles has a model number that is engraved in the side of the nozzle • Each nozzle should be placed OPPOSITE of the corresponding label -
What should I do if I am unsure of what chemicals to use?
Please reference the compatible chemical list which can be found here (https://ryobitools.com/compatiblechemicals). We are always adding to this list so please check it periodically to see what additional chemicals have been added.
Electrostatic Sprayers
Related Videos:
Electrostatic Advantage
- Maximum Coverage
- Positively charged ions wrap around entire surfaces clinging to negative and neutral charges
- Faster Coverage
- Electrostatically charged particles spread across entire surfaces for faster coverage
- More Efficient Coverage
- Electrostatically charged particles cover entire surfaces faster, using less chemical
share
Tips
How to Prime Your Electrostatic Sprayer
How to Prime Your Electrostatic Sprayer - If your ES Sprayer is sputtering instead of consistently spraying your solution, it may not be primed. To prime your sprayer please follow the steps below: 1. Turn the nozzle to the High setting 2. Hold the trigger down until the spray pattern appears even and consistent and you can see that all air bubbles have been forced through the hose 3. After 1 minute if the sprayer does not prime follow the below steps (Could take longer for first use out of box) 4. Check hose connections are secure (applies to 1 gallon sprayer only) 5. Loosen tank cap 6. Fill hose with liquid by pressing down the metal bar and forcing liquid through (applies to 1 gallon sprayer only) 7. Turn sprayer to left and right side 8. Check Filter between QC Hose and the Tank (applies to 1 gallon sprayer only) 9. Force air or water through the back of the unit (applies to 1 gallon sprayer only) 10. Once sprayer has even and consistent spray, rotate nozzle to desired nozzle setting for application
Chemical Compatibility
If you are unsure of what chemicals to you, please reference the compatible chemical list linked below. We are always adding to this list so please check it periodically to see what additional chemicals have been added. https://ryobitools.com/compatiblechemicals
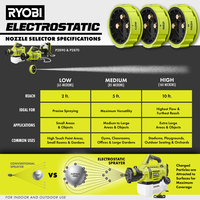
How to Choose a Nozzle
See posted nozzle selector guide